Showing posts with label tutorial. Show all posts

Thursday, September 19, 2019

How to Make a Fabric Collage Quilt


In my last post, I told you that I was making another fabric collage quilt, like the llama I had made a while back. Tanya asked for step by step directions, so I will happily show you the steps I followed. I think it will show you how flexible this process can be.

What you will need:
  • Some kind of small scraps. Since I need really small pieces, I like using the fabric that is in my fabric trash can.  I used strips I had created when I trimmed up some blocks.
  • Some kind of adhesive. I used a fusible steam-a-seam2 sheet, which then requires an iron, and a glue stick.
  • Needle and thread to sew things down. With so many little pieces, you will want to do a lot of sewing, so a sewing machine will make it much easier. If you want to hand stitch, you could add a layer of tulle to help hold all those little pieces down.


Step One: Choose the Design


 I decided I wanted a camel to go with my llama.  I drew the camel on the side of the side of the fusible that stays on the piece until it is ready to be fused down to the base.  When you are drawing on that side, make sure that you reverse the position so that the piece will be facing the right way. The camel drawing is facing the left, and as you will see later on the post, the camel will face right on the quilt.

This photo is obviously a recreation. The actual fusible sheet is bigger than a sheet of copier paper. If you want to save fusible, you may want to place the shape in a corner of the sheet instead of the middle.


Step Two: Place the Fabric Scraps on the Fusible


I didn't take a picture of the whole sheet, but I think it will be easy enough to figure out with the words. Take the paper off from one side of the fusible and set it aside. This is the paper that does not have the drawing on it. Lay the paper on a table fusible side up as you want the fabric to stick to the glue side. If possible, working on the ironing board would be best since you won't then have to move it to the ironing board.   You may want to tape the fusible sheet down to keep it secure, but I did not do that.

Place the fabric strips face up on the fusible. It is better to slightly overlap the fabric strips. If you have a piece that does not stick to the fusible where you want it, like places where there is too much of an overlap, you can a glue stick to add glue to the back of the fabric to stick it down. I just placed the strips down randomly, but of course, if you wanted a particular color in a particular part of the shape, you can do that as well.

Make sure there is fabric that covers the entire perimeter of the drawn area.  It is better to go slightly over so you can make a clean cut. Instead of just putting fabric on the camel shape, I covered the entire sheet of fusible.  The picture above shows the pieces I had left after the camel was cut out.


Step Three: Cut Out the Shape and Place it on the Background


I actually cut out the camel and placed it on the background next, but I don't have a picture of that, so I will move on to the other shapes because they show the process better. I looked at the shape of the leftover fabric and tried to imagine what animal would fit on that shape.


In this case, I placed the drawing on top of the fabric and cut out the perimeter. Since these drawings were on top of the fabric, I did not have to reverse the drawing. If I had wanted the animals to face the other way, I could have placed the drawing on the back of the fabric and then cut out the shape.


I used a pin to hold the drawing to the fabric and was able to pinch the shapes with my thumb and forefinger to hold them down and did not have any trouble. I was able to fix any fabric shifting before cutting.


 No actual cats were harmed in this process.


You can also combine pieces to make your shapes.  I made the fins with separate fabric because I wanted the fins to go in different directions.

Now it is time to bring out the iron. You now want to press the shape onto the background fabric.  Take the paper off of the fusible and position your object onto the background where you want it. You can move it if you aren't happy with the position. Once you are happy with the position, make a pressing sandwich.  Use that wax-like paper you set aside. Or if you have a pressing sheet, you can use that. Place it over the shape to protect your iron from getting any fusible glue on it. Your piece is sandwiched between the pressing sheet and the background. Press the shape with the iron according to the directions on the fusible to secure it to the background.

This tutorial is written by Shasta Matova and published at High Road Quilter on Blogspot.

Step Four: Stitch Down the Strips


At long last, I present a picture of the camel. It does exist!  The next step is to stitch it down. Some quilters would have insisted on pressing the background fabric until the folds were ironed out before adding and stitching the shape.

You can, of course, make a fabric collage as a background, but I decided to keep my backgrounds plain since I will be adding words.

You can add additional strips at this point if you see places where the fusible is peeking through and places where you prefer a different fabric. Also glue down any pieces that still seem loose. For the camel, there was a large piece of scrap that seemed to be too solid and I didn't think it went well with all the skinny pieces, so I added more strips on top of the original strips.  I glued them down with a glue stick to make sure they stayed in place. Make sure to maintain the integrity of the shape by keeping or trimming the new strips inside the perimeter.

I placed the batting underneath the background to do the stitching. I left off the backing which will later be secured with quilting. If you want to prevent lint, you can use felt instead of batting, or add another layer which you will cover with the backing, or if you don't mind a lot of stitching in the backing, you can just consider all the stitching to also be quilting.

I used wavy lines to stitch down the shapes because my free motion foot broke and I was too lazy to get the other one.  For my llama and elephant, I also used a combination of free motion and embroidery stitches to stitch down the fabric. If you are sewing them by hand, placing a piece of  tulle over the shape will help you secure all the pieces.

The key is to secure these little pieces so they don't fly away so the more stitching, the better.

I plan to quilt around the shape with dark thread to make them more prominent, but you can also use a zig zag or buttonhole stitch or otherwise show the outline of the shape onto the background.


Step Five: Add Words


Yes of course this step is required. Why were you expecting me to say it is optional?

The cornier the words, the better. I wrote the words on a sheet of typing paper and pinned it to the background fabric, and then sewed through the paper to trace the words using a short stitch length.  Then rip off the paper. Tweezers will help remove the rest of the paper.

You can also use a disappearing marking pen to mark the words you can stitch. If your free motion foot is not broken, it is easier to use that to trace the words instead of turning the fabric using a straight stitch.

 You can also avoid the stitching completely by using a permanent fabric pen to write the words on the fabric. Or if your machine has an alphabet, you can get the words on the quilt that way. Or embroider by hand.

I think I will hand stitch or quilt over these letters to make them more prominent.


Step Six: Add Other Embellishments


You probably figured out you can add the embellishments before the words. You can add the eyes and other details either with fused strips, quilting, embroidery, or fabric markers or fabric crayons.  You can also add other things like beads, ribbons, or other quilting scraps.


The original plan was to make a separate camel quilt, but now that I have so many figures, I am thinking about putting all of them on the same quilt. So for now, I will leave you here with "quilt as desired, finish your project your way."

Other tutorials on this blog:
Scalloped Border Tips and Tricks
 Matchstick Mansion Quilt Tutorial
11Suggestions on How to Avoid Unfinished Quilts (UFOs)

Binding Fixes
How to Make Fold Over Binding

Linked with:
ScrapHappy Saturday
What I Made On Monday

Tuesday, March 12, 2019

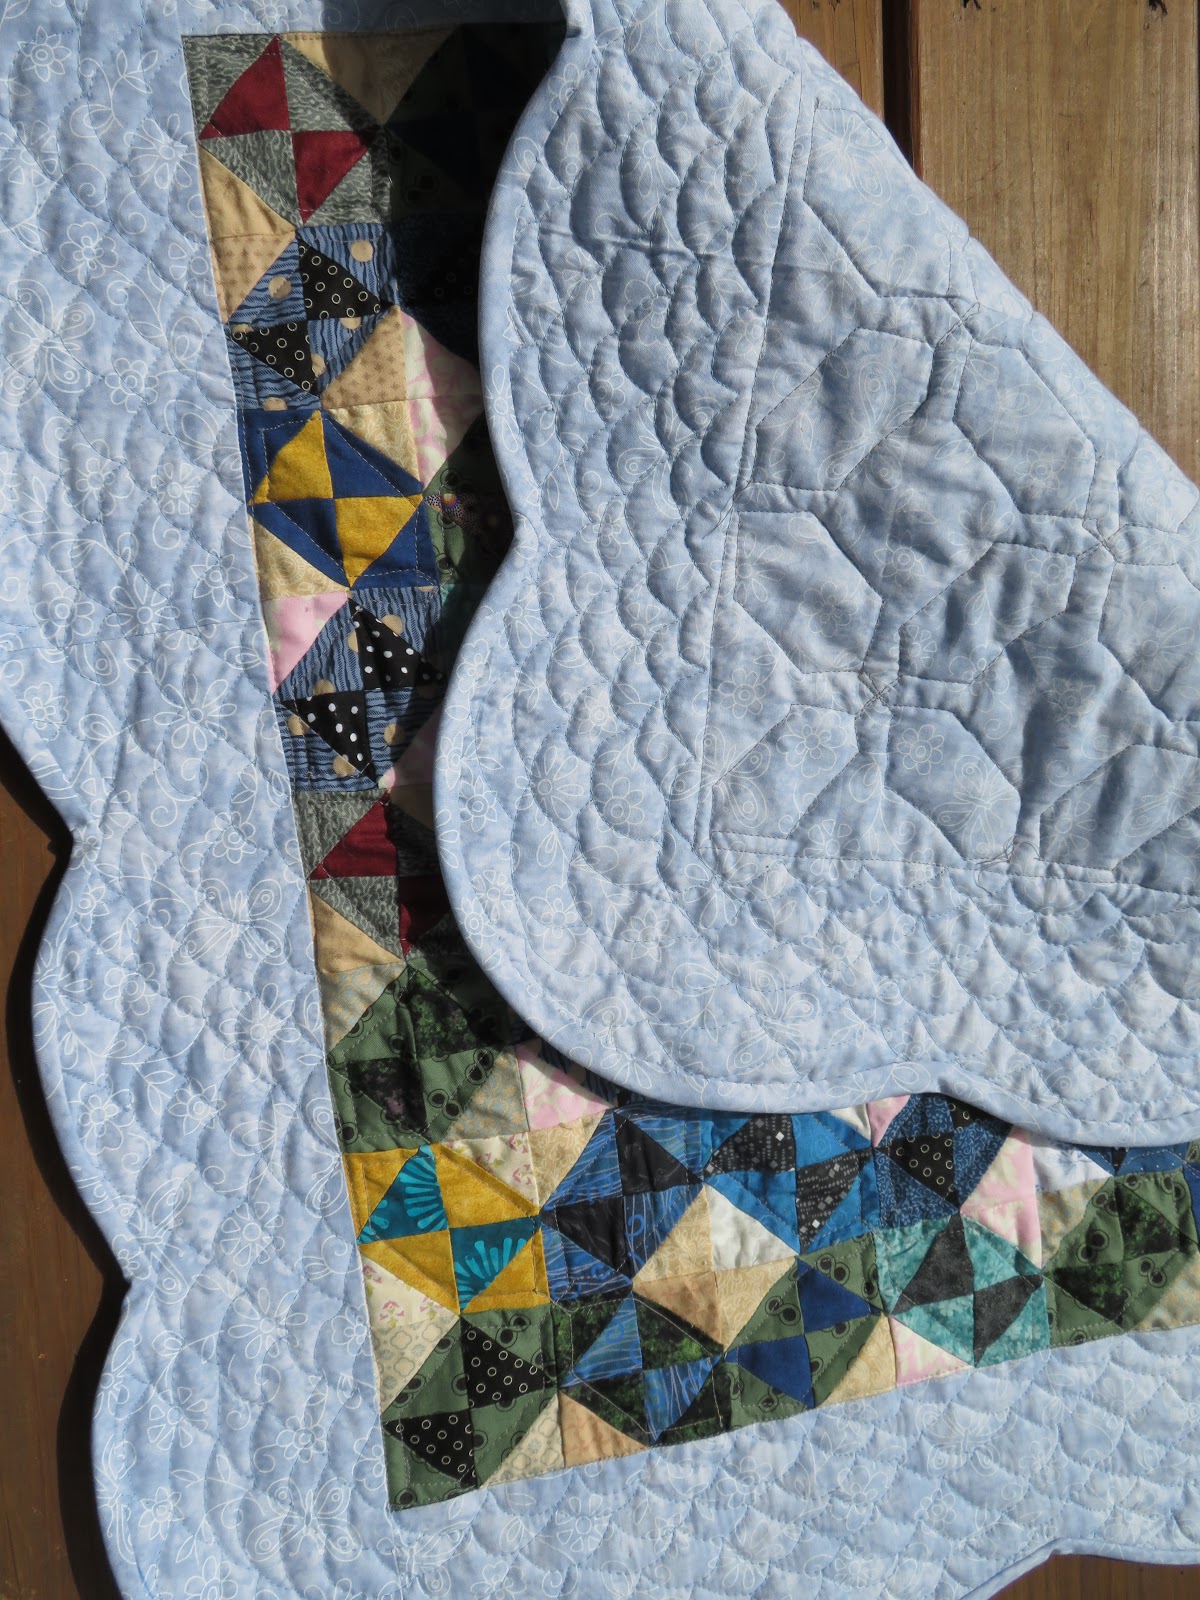
Scalloped Border on Quilt - Tips and Tricks


In my last post, I showed you my completed quilt with a scalloped border. Kate asked me for my advice on making a scalloped border. I'm glad she asked because I was thinking about writing a post to remind myself how to do it in case I want to do it again, so I am happy to oblige. Most of this will be in the form of YouTube videos. I watched several videos to get ideas, and am providing my favorites.


I watched this video from Missouri Star Quilt Company. It uses a tool to draw the borders. I used a plate.

What I learned from this video is that the steps of making a scalloped border:

1. Make a quilt top, include a plain border. I recommend adding a slightly bigger border than you think you need. It is going to look smaller once everything is done, plus it looks smaller with holes cut out f it.  I also figured if it turns out horribly, I could trim it and make a smaller straight border.

2. Quilt as desired.  A general overall design probably works best for a border so you don't have to take the scallop in consideration. Quilt the whole border, even the part you will be trimming off so you can get all the way to the edge. I missed this step, but next time, I will trim the quilt square (or rectangular).

3. Measure the scallops.  Divide the quilt in half to find the center.  And then divide into whatever number sections you want. I used a freezer paper template to try it out first. I folded the freezer paper to find the sections, and found a plate about the size of those sections, which was a dinner plate. I drew the scallops on the paper and tried it out on the quilt to imagine what it might look like. Cut on the marked line on your freezer paper and press the paper to your quilt to secure it.

4. Mark your cutting line on the quilt. I used a washable marker, which worked out well. I took the scallops all the way to the edge of the quilt, but the video shows space between the top of the scallop and the edge of the quilt. I guess it depends on how big you want your border to be. I did manage to get stray lines where I made mistakes, so I recommend using a washable marker even though, technically if you do it right, you can use something that isn't washable since you can trim it off. Remove, reposition, and press the freezer paper and mark the entire quilt. You can extend or shorten the lines to make the scallops fit and look pleasing.

5. Once you have the quilt marked and are happy with where the scallops will be, breathe deep and cut your quilt on the cutting line.

6. This isn't in the video, and I am not sure it is necessary, but I folded my quilt different ways (joining left and right sides together, joining top and bottom sides together, and diagonally, one at a time) to compare the scallops to make sure they were balanced, and trimmed the ones that weren't.  My end result isn't exactly the same on all sides, but it is pretty close.


Then I watched this video on how to make continuous bias binding. This tutorial lets you use a rectangle to make the binding and avoids having extra triangles left over.  It also is continuous so you don't have to cut the strips separately and sew them together. The piece looks weird as you are sewing them together, but it might be easier to make this binding this way instead of sewing the strips to each other one at a time. I think I may make binding like this in my future quilts even if they aren't scalloped.

I sewed the binding on the quilt like the Missouri Star Company video showed.


Lastly, I wanted to share this video with you from Sugaridoo. I wasn't looking for a video on how to sew down a binding because I have done it lots of times. I have really enjoyed watching Irene's videos about her cute projects and her life in the Netherlands, and was surprised by how much I learned from this video. She uses a different way to sew down the binding, a stitch in the quilt, a stitch in the binding, which I think is probably more secure than the blind hem stitch I use - stitch in the quilt, catch a few threads in the binding, stitch in the quilt.

I didn't make a notch in the quilt because it didn't seem necessary. I don't know what the corners are supposed to look like but they look okay to me without the notch. I was expecting to have a fold at the scallops but there isn't one.


After I had already finished my quilt, I found this tutorial which shows you how to make a scalloped border without a separate binding. This may be easier, but since I didn't have any trouble with a binding, I guess it depends on your preference. This video shows a different way to measure the scallops so it is worth watching and learning as well, even if you do want to use a binding.

Making a scalloped border on a quilt wasn't as difficult as I thought it would be.  It really doesn't take a lot of extra time, apart of measuring and marking the cutting line, and makes a big impact. It is a great way to make a quilt more special. To modernize it, you could use a quilt top that is made in a more modern style, or put the scallops on just one or two sides to make it asymmetrical, or have a really large border to have more negative space for quilting. You can also cut the shape other than a scallop.

Linked to:
Works in Progress - I just finished this quilt, but there are lots of quilts in progress!
Friday Foto Fun

Sunday, February 10, 2019

Matchstick Mansion Quilt Tutorial


When I showed my finish quilt, Mighty Matchstick Mansion, Joyful Quilter asked if I would mind if she made one too.  Due to popular demand, I have decided to show you how I made this quilt.


 I started with some one and a half inch scraps, sewed end to end to form a long chain. Press them all in one direction. These were actually "borrowed" from another project.


I sewed them together, around and around the yellow, log cabin style. It helps to  have an iron close to you as you sew, so you can press after each seam. In this picture, you can see that the green fabric was cut to match the center, and that the green turned the corner to form the next log. You can also see that I lost track of which way I was turning. You can also see the creams and the white turn the corner in subsequent logs.  Because the white was so short, it looks more like an extension than a turning of the corner.

See that teeny tiny sliver of cream at the top of the block in the picture above? If that sliver had been any smaller, it would have added bulk to the seam for no reason. 


For purposes of this discussion, pretend the left fabric is the current quilt top and the right is the fabric chain.  Before sewing each new row, I placed my fabric chain next to the quilt where it was going to go. It gave me a chance to see what the new addition would look like. If I did not like the match, I could place the chain on another side of the quilt, or I could turn the chain upside down and see if I liked that way better.

This audition also helped me figure out the size.  If the chain had a seam at exactly at the right place where it would have been cut off, I took out that seam.  This happened more often than I thought it would.

If there was going to be a seam at the bottom that would add bulk without adding color, I could adjust the size of the top of the strip so there wouldn't be a seam too close to where the next seam would be at the bottom.To fix that, I could adjust the top of the strip chain. If I cut an inch or so off from the blue scrap, then that would change the placement of the white scrap and I could just add that inch to the bottom of the strip. If the top scrap is too small to cut a whole inch off, I could just cut off a little bit and throw it away.

I cut the chain to the size of the quilt before sewing it on.


I ran out of my chain of fabric pretty soon and had to cut more pieces. Here you can see that I lost my log cabin, and it turned into a mansion.  It seemed like there would be too much orange if I sewed it on the right side so I sewed it to the left side instead.  Then as I added more rows, I just added them wherever side of the block I wanted, sometimes by chance based on which way the quilt was facing and sometimes because I liked the added row in that spot. Sometimes I did it to avoid skewing the quilt. I have heard you are supposed to sew in opposite directions to avoid skewing, so sewing in different ways I think helps keep it square.

Just trimming the quilt helps to keep it square helps too.

When I got to the point in the picture above, I realized I was focusing so much on the orange that I had lost track of light and dark. To me, even though this was a good size for a small quilt, there was too much light on the top right and too much dark on the left side. It could be okay, like sunshine and shadow, but I wasn't going for that look. It just happened that way. In order to fix the balance, I had to keep adding more rows.


As I added more fabric to the chain, it was very tempting to choose fabric more selectively. Is this fabric too bright? Is this one too dark? I decided that all the fabric in the box was fair game for this quilt and I was going to let serendipity take its course, which was the plan all along. It also meant that I was not allowed to selectively place the lights and darks to fix the problem I saw in the picture above this one. As you can see, the problem fixed itself without my help. I think if I had tried to do it, I probably would have over-corrected and added too many darks on the right side.

I was having fun making this quilt and decided to go ahead and make it big enough for the Project Quilting challenge. At some point when I am dead and famous, the curator at my quilt museum is going to decide to display all my quilts in size order, and will be disappointed that there is a gap between my small, bulletin board size, quilts and my above the couch wall hangings, and she will be happy to have a few quilts that fall between these two sizes. You're welcome, future quilt curator.


Since both my cutting board and my ruler were 12 inches square, it became a little more challenging as the quilt grew. Keep adding as many rows as you want until the quilt is the size you want it to be, and save the rest of your fabric scraps for future quilts.


Sandwich, baste, quilt as desired, trim and bind.  I think this ugly step is added so you can really appreciate the final product.

I think this quilt would work better as blocks instead of just one big quilt. If you have more than one of these going at the same time, you could chain piece them. I had to use another quilt as a leader / ender.

I got the idea for this Lego quilt from Tonya Ricucci of Lazy Gal quilting way back in 2011. Her idea sparked by an antique quilt is to sew rows to make a rail fence. She spent a lot of time auditioning and making sure the colors and fabrics balance.  I think for a scrap quilt, the viewer's eye is going to go all over the place anyway so I don't think all that effort is really worth the time. Most issues will work themselves out, like they did in my quilt. Chawne Kimber also made this quilt with a chain like I did, and she added some log cabins to her quilt too instead of just using straight rails.

I hope this tutorial helped, and if you do make this quilt, I would love to see your rendition!


Week 6 of 15 Minutes to Stitch

Since it is Sunday, it is time to recap my stitching this week.  I worked on Mighty Matchstick Mansion most of this week, and thought about the borders for the improv rail fence quilt.  Today, I also worked on my other quilts, Sunlight in Winter and Butterfly Wreath because I had neglected them for so long working on deadline projects.

15 Minute sessions of stitching this week:  7 out of 7
15 Minute sessions of stitching this year:  41 out of 41 sessions
Success Rate: 100%

Linked to:
Life in Pieces 15 Minutes to Stitch 
Oh Scrap! 
Silly Mama Quilts Works in Progress

Wednesday, April 18, 2018

11 Suggestions For How to Avoid Unfinished Quilts (UFOs)

Most of the activities we do in life have parts that are more enjoyable than other parts. Sometimes even the more enjoyable parts may feel less enjoyable depending on our mood or the circumstances.

The same goes for quilting.  Most of the things we do in quilting is enjoyable. They have to be, or we wouldn't be quilters, would we?  But there are times when the process seems cumbersome and we either have to push through those less enjoyable parts to abandon our projects before they are finished. They become the dreaded UFOs -- unfinished objects.

Here are some suggestions on how to avoid the tedium of quilting and avoid a pileup of UFOs. You can use one or a combination that will be most effective for your project and your personality. I will warn you ahead of time that some of these may give you the the opposite effect, so you may have to abandon them after trying them. When you do, abandon the suggestion for that project, not the project itself!

DVIDSHUB CC BY 2.0 via Flickr

Avoid Tedious Projects

The best way to avoid UFOs is to avoid projects that you know will cause you trouble. Just don't start them in the first place. If you know you don't like making the same block over and over again, don't make quilts that have that sort of pattern. There are plenty of other types of projects available. Allie prefers to work on applique projects because she prefers applique over piecing.


Remember the End Goal


When I saw the quilt mystery on Quiltville, I knew that this quilt would have lots of small pieces and lots of repetition of blocks, but I decided to make it anyway.  I pictured the finished quilt on my bed and now I want to see that quilt on my bed.  When the piecing becomes tedious, I can think of that mental picture and that helps me push through the boring parts.  I chose to make this quilt because I want it on my bed.  I had decided it was worth the repetition, so now I have to deal with the repetition. It is short-term pain for long-term gain.

Adapt the Pattern


There are many ways you can adapt a pattern to help you avoid or minimize parts that you do not enjoy. When I started the On Ringo Lake mystery, I made just a few blocks so I could make a smaller quilt than the pattern. That way, I could enjoy the process of making the quilt without the commitment of a bed quilt. When I saw the blocks, I decided I would rather have a bed quilt, but I could easily have decided to make the smaller quilt instead.

Another way I could have adapted the pattern is to make alternating blocks that didn't have as many pieces. I could have alternated with a different block with fewer pieces, or even alternated with solid, applique blocks. I could have used a solid instead of a pieced sashing. Either of these would have let me have a bed size quilt with less piecing.

This adaptation can be made before you start the project, but it can also be made at other times.  When the project is in danger of becoming a UFO, take inventory and see what you can do with the progress you have already made. This may mean you will have a table runner instead of a bed quilt, but at least you will have a table runner.

Vary the Process

Instead of cutting all the pieces first, then sewing each step in a particular order like a factory line production, you can vary the order in which you do things.  Since I wasn't sure at the beginning what size I would make my quilt, I made some blocks, then I made a few more, and then I made a few more.  By alternating the cutting, sewing and pressing processes, I was able to add variety. While this still involved making the same number of blocks overall, this avoided my making many of the same seams all at one time.

Jourdan Dukes cc by 2.0 via Flickr

Add a Change

If things are getting boring, it helps to change things up.  I did this by adding a new fabric to the mix.  I went through my scraps and added a few pieces that went with the fabric I was already using.  Adding this new fabric that held a memory for me helped add the variety I needed to push through.  Some of this was background fabric, and all of the additions were small pieces, so they didn't make a difference in the overall look of the quilt, but they did make the process less repetitive to me. Sometimes a small change can make a big difference.

Make Some Rules


Sometimes some rules can help with motivation.  Here are some I've tried:
  • No new projects until the old ones ares finished
  • No chocolate until I've quilted for at least 15 minutes
  • I can start one new project for each one I finish
  • I will add some seams for the repetitive quilt in between working on a quilt I am not finding repetitive

Be Accountable


You can make a promise and have someone check up on you to see if you have kept the promise, or you can make it more public by putting it on your blog.  I have challenged myself to stitch for at least fifteen minutes each day, and I show my results every week, even on weeks where I was not able to meet the challenge. It provides motivation for me to try every day since my results are public.

Get Some Help

 If you are stuck because you don't know how to do a particular step, solve a particular problem, or can't decide which option is better, sometimes asking for help can get you unstuck. Whether you ask a quilting buddy, or ask on a blog or social networking site, you may be able to get suggestions, advice, and positive encouragement to keep going.

Tish said:  "I also think adding having a quilting advice buddy is a good one. So if you get stuck on something like 'how to quilt it?' you can bounce ideas off of them."

Create a Challenge

I tell a student that the most important class you can take is technique. A great chef is first a great technician. 'If you are a jeweler, or a surgeon or a cook, you have to know the trade in your hand. You have to learn the process. You learn it through endless repetition until it belongs to you. Jacques Pepin
There are many ways you can add a challenge to your quilting. When my daughter was in school, instead of having the students memorize the times table, the teacher challenged them to see how many multiplication problems they could solve in ten minutes. These timed tests helped make the worksheets easier and gave them motivation to find ways to do them faster. To translate that in quilting, you could challenge yourself to:
  • master the quarter inch seam
  • improve the  quantity of your work by seeing how many blocks you can make in a limited time period
  • improve the quality of your work by seeing how many blocks you can make without making a mistake
  • improving your vocabulary by timing how many blocks you can make without cursing
  • learning to avoid distractions by seeing how many blocks you can make without getting interrupted
  • practice good habits or build endurance by working on that quilt for at least fifteen minutes a day 


Fix Your Attitude

Kaja said "There are boring bits to almost everything; it's about the balance between those and the things we love to do." If we keep the boring part in perspective, we can push through them to get to the parts we enjoy.


Make It Fun

Add some lively peppy music or listen to a good book. Dance as you go back and forth to the ironing board.


Enjoy the Process

The most important suggestion is to enjoy the process.  I quilt because I enjoy quilting, not because I want a quilt at the end. When I immerse myself in the enjoyment of the process instead of looking ahead to the end result or the number of blocks I have to make, I really enjoy the meditative quality of quilting. many other quilters feel the same way, and it is one of the things we love about quilting. Sure there is excitement about starting a new project and finishing one, but the bulk of our time and attention is that time in between starting and finishing.

Kyle said: It all can be a soothing rhythm even if there are times with a lot of repetition.

Kate said: Sometimes there is a lot of repetition, but I like to call that my meditation time, my brain just floats while my fingers do the work

Rail Fence by Shasta Matova


Try these eleven suggestions, either individually or in combinations. I think they will help you get your UFOs finished! What do you do to motivate yourself to keep quilting when you are in a slump?

Lnked to:
Let's Bee Social 224 
Off the Wall Friday
UFO Busting 16 
Moving It Forward Monday 

Tuesday, December 21, 2010

Tutorial: Binding Fixes

Way back in September, I presented a tutorial on how to fold over binding. In that post, while showing you how to make a binding by folding over the backing to the front, I made a couple of errors, and I promised that a tutorial on how to fix the errors would be forthcoming "very soon."  I fixed my binding, took pictures, and eventually forgot about my promise.  Since that post is one of my 10 most popular posts, I think maybe it is about time that I make good on my promise. Here's what I said:

10. Now, if you didn't follow my advice in step 4 and have any issues, you have options.  You can decide you want a separate binding after all, or you can wait for the next tutorial (coming up very soon) where I will show you some intermediary steps.


I don't recommend doing this.

I am sorry that I left you wondering how I fixed this problem. When you first encounter this problem, it is important not to panic. You can keep clear headed and decide what to do. There are two ways to fix it.

One way is to give up on the fold over binding, and decide to do it the regular way with a separate binding. To do this, you can trim all of the backing even with the edge of the quilt, and attach a separate binding. But if you are making a casual quilt, one that is meant to provide love and comfort for kids, and not one you are showing to the quilt police, there really isn't any reason you can't add more love by fixing your errors. A little secret spot that got some extra attention might be just the place that the kid will gravitate to when he needs some extra attention himself.


First, trim off the error.  You don't want to look at it any more than you have to.  Then, find a piece of similar or matching fabric that is bigger than the error.  You want to have enough fabric that you can fold over the ends, and still have it big enough to cover the problem area.
Fold down the sides and pin right sides together.  With a machine sew from edge to edge, including the folded over parts.  It is okay if you manage to sew through the batting seam.  That part will be covered up with the binding anyway, and might add some extra security to your layers. 


Fold the fabric up over the seam, and it is almost as good as new.  Trim your little piece to be even with the remaining fabric.  Repeat for as many errors as you made (I made two), and proceed as usual with the steps shown in the first tutorial.  Because the sides aren't sewn, you will have to either hand stitch or machine stitch them when you are done.  I used a machine.

Monday, September 6, 2010

Tutorial: How to Fold Over Binding

I thought I would record what I learned in case I ever use this technique again.  I am making a Quilts for Kids quilt, and I wanted to make a binding that was quick and simple.  I didn't have (or didn't want to look for ) coordinating fabric for a separate binding, and I didn't have enough backing fabric to make a double fold binding.  Plus I wanted to try a new-to-me technique.  I decided to fold over the backing to the front as I have seen others do in the past.

The problem with this method (and with any other method) is that I have to bring cutting implements near the quilt top.  This is very scary to me, because of a traumatic past experience. 

Comparison to Separate Double Fold Binding

Advantages:
  • takes less fabric 
  • hand sewing not required
  • probably quicker, I'm not sure.
  • nice to have alternate techniques in your arsenal
  • not wasting the extra backing fabric. You have to add extra backing anyway, why not use it up right away?
  • stitching shows on top of quilt which is good if you use a nice decorative stitch
Disadvantages:

  • probably not as strong as a double fold binding
  • cutting implements near quilt (twice) is dangerous
  • probably won't win awards
  • stitching shows on top of quilt, which is bad if you have issues with stitching or can't find matching thread


Here are my tips / steps.  It isn't that complicated, but I like to explain things and break out lists in very small steps. Please critique this tutorial and let me know if I explain too much, am too wordy, or left anything out, or how I can otherwise make this tutorial better.

Directions


  1. Make your quilt top.  Sandwich and quilt, but don't quilt all the way to the edge.  The mat is going to have to stick in there, so leave about a quarter to half an inch from the edge. When you are done quilting, take out any remaining safety pins or basting where they can interfere with the binding process. 

  2. Lay the quilt flat again.  I use a floor because the table has too much stuff on it.  Put the cutting mat between the batting and the backing, as far in as the quilting will allow you to go.  Be gentle, you don't want to mess up the quilting.    Make sure everything is nice and flat.  The top, the batting need to be nice and flat.  Also pull the backing underneath the mat and check that it is flat and smooth under the mat. 

  3. Put the ruler on top of the quilt.  I like to line it up with the inner border to make sure I have a nice consistently straight line so the quilt top is nice and square.

  4. Do not skip this quality control step.  Lift up the batting over the ruler to be sure that the backing is flat.  Be careful that when you are doing this, you aren't also pulling up the backing.  If you leave a fold like this,


    Batting folded over for quality inspection.  Backing should all be under ruler,
    but here it is peeking through.

    it can cause a cut like this!


    I don't recommend doing this.

  5. Plan how much you are going to cut at a time.  You want to make sure you aren't cutting too far, off the mat or away from the ruler area.

  6. Cut at your own risk.

  7. Move the mat and ruler and repeat steps 2-6 as you go all around the quilt, especially the quality control step. You can do that step several times if you want. But do it carefully.

  8. Batting has been trimmed
  9.  Decide how wide you want the binding to be. First, find the area where the backing sticks out the least from the quilt top.  That is the largest your binding can be cut.  Then look around the edges of your quilt top to see where the top doesn't quite make it to the edge, not that you have any of those. 


    Quilt top didn't quite meet the backing here

    You want the binding to be large enough to cover this spot and a little bit more. That is the smallest your binding can be cut.  You will be folding the binding over itself to cover the raw edge, but may want to tuck about an extra quarter inch of the raw edge under the quilt to have two layers of fabric at the most vulnerable part of the quilt, the edge. If you do, that will affect how wide you want to cut the binding.  I played around with folding the backing over the top to decide where I wanted my cut. You can take a practice spot and try cutting it different widths to see what works.  Remember, start big and work your way down to smaller sizes in small increments.  I decided to cut 1 and one fourth inch (1 1/4) away from the edge of the quilt.

  10. Put the cutting mat under the backing this time, line up the ruler for the measurement you determined in step 8.  Make sure everything is nice and flat, and cut carefully.  Repeat around the quilt. You don't need me to break all this out into mini-steps.  You are a pro at this.

  11. Now, if you didn't follow my advice in step 4 and have any issues, you have options.  You can decide you want a separate binding after all, or you can take these correcting steps.  If you didn't have any issues, you don't really need my tutorial, but you are almost done, so you might as well finish reading, just to make me feel good. But if you stop reading, I won't know.

  12. You want to fold the binding fabric against itself first to hide the raw edge.  You can just fold in half, but I recommend folding about a quarter inch more, so you can tuck some of that fabric under the batting.  This will give you a semblance of a double fold binding, and makes sure there are two pieces of fabric over the most vulnerable part of the quilt, the edge.  Fold the folded fabric over the quilt, pin or otherwise baste, being careful to have a consistent binding size throughout the quilt. Since I had a limited number of pins on hand, and because I didn't want too many pins stabbing me, I did one edge at a time, long, opposite edges first.

  13. You can sew by machine or by hand.  I used machine since I could see exactly where I was sewing. A decorative stitch would be nice, but a straight stitch works as well.   If using the machine, put in a walking foot, and change the settings on your machine accordingly. Use thread that is close to the color of the binding fabric.  I put the pins in facing the needle, so I can easily take them out without getting close to the needle.  Sew from edge of quilt to edge of quilt, about one eighth of an inch away from the fold. I would backstitch at the top and the bottom if the backstitch button worked on my machine.  I just use a shorter stitch length since it doesn't.  You can probably sew all the way off the binding fabric, but I didn't so I don't know what the quilting police would say if you did.


    Sewing binding down

  14. To do the other two sides, you will have to deal with the corners.  To make the mitered corner, fold a triangle in the corner first,


    Fold binding diagonally into triangle.  Pin optional.

    then fold the binding over itself in half (or more) as before.


    Binding folded over itself.  Pin still optional.

    Fold the folded binding over the quilt and pin. 


    Binding folded over quilt.  Pinning highly recommended.

    Sew down the miter and the rest of the binding. You can do the miter by hand if you don't want stitching to show in the back, but I did all by machine.  Do the same for the rest of the quilt.   Label your quilt and you are done. Congratulations!