Showing posts with label improv quilt. Show all posts

Thursday, August 8, 2024

Quilt Reveal: Beach Picnic


Ta Da! I finished the Beach Picnic quilt that I made for the June blog hop. Joan from Moose Stash Quilting and Carol from Just Let Me Quilt take turns hosting a year long blog hop. They chose a different theme for each month. 


The theme for the June blog hop was For the Birds. The project is simple, and just needs a bird on it.


I made the quilt in June, but I had not finished binding it. 


I posted the unfinished project here in June.


Now it is finally finished.


I added a pole with directions to other features on the beach for the picnic goers. I didn't add any words so the beach can have everything the family wants: snorkeling, fishing, boating, boardwalk, shopping, parasailing, sandcastle competitions, art galleries, and of course, bird watching. Whatever they want, it is here on this beach.


It adds a story element to the quilt and explains why the people have abandoned their picnic.


This was a really fun quilt to make and makes me want to make even more beach picnic and seagull quilts.


I posted a video on YouTube showing how I made this quilt.


Here's my finishes chart so far. As you can see, there are a lot more starts than finishes this year, so no new beach quilts for me today. I am hoping to get more progress on unfinished quilts this month.


Linked with:

Patchwork and Quilts

Sunday, September 10, 2023

Quilt Reveal: Making Friends


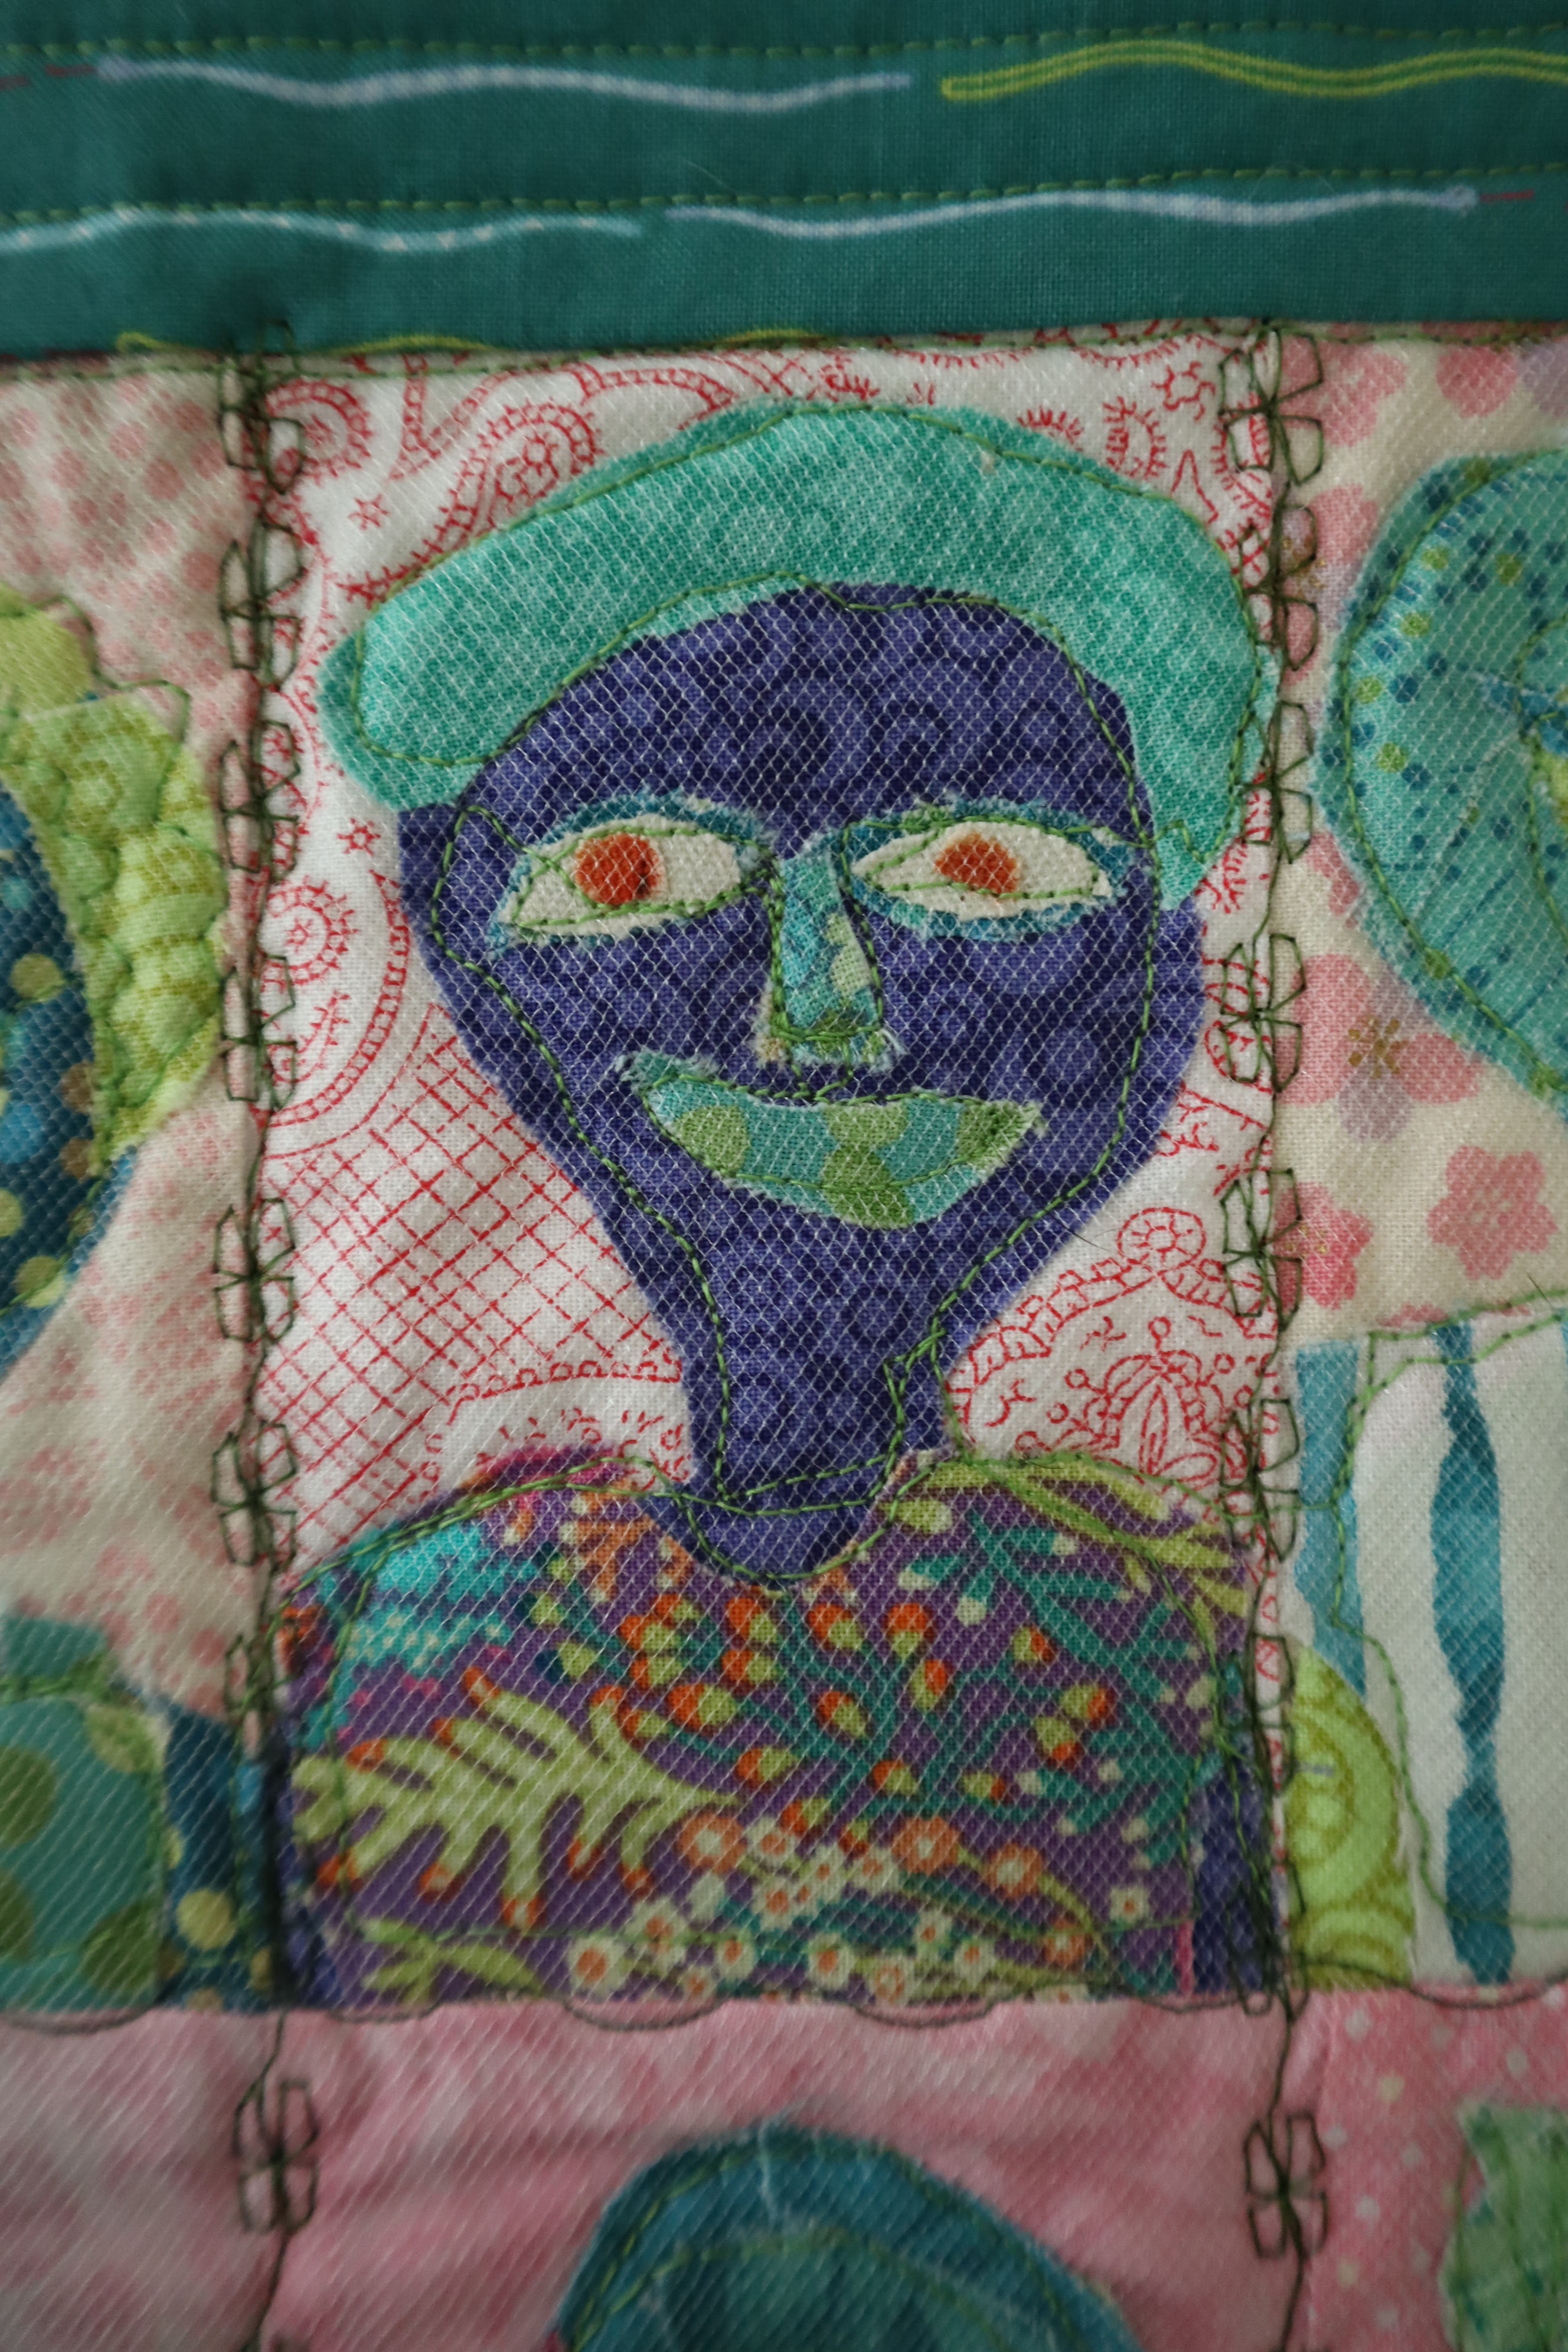
 I finished the portraits quilt I showed you in the last post.


I used the index card portraits as my inspiration, so I used background fabric that would result in the same size as the index cards.


I used fusible applique to add the body and the body parts: hair, whites of eyes, eyeballs, nose (optional), mouth, and clothing.


I decided to use the binding fabric as a border instead, and since it looked like a frame, I decided to birth the quilt instead of bind it.


I used embroidery stitches to stabilize the quilt instead of stitching in the ditch.


I added straight stitches in the border to mirror the look of the frame.


Finally, I used free motion quilting to secure all the fused pieces.


Although I had a bit of a panic when I thought the portraits would look like aliens instead of people, I settled on the idea and am really happy with how it turned out.


It took me 24 working hours to edit the video, since there were so many clips as it took me a little less than two weeks to make the quilt, and the software added extra, duplicate, and unnecessary clips.


15 Minutes to Stitch Week 34, 35, 36

 I have been awful about reporting my 15 minutes to stitch progress this year.  The good news is that I did stitch every day these three weeks and even finished a quilt - the Making Friends quilt I have been showing you on this post.


15 minute days these weeks --21 out of 21
15 minute days this year -- 183 out of 253 days
Success rate  = 72%
 
 
Linked with:
 15 Minutes to Stitch follow this link to see all the other people who participate in this challenge
 

Saturday, February 9, 2019

Quilt Reveal: Mighty Matchstick Mansion


In order to use up my scraps, I decided to make a rail fence quilt.  This quilt is designed to use up the scraps that were too small to fit into the rail fence quilt. These are all one and a half inch strips that are too short for the rail fence quilt.  So they are more like matchsticks really.

It took a long time to cut up the scraps for this quilt, because it is supposed to use leftovers from the rail fence quilt, named Fourth Rail.  I had to cut the scraps for Fourth Rail, and then the leftovers were used for this quilt. Sometimes I cut up a scrap of fabric and Fourth Rail used them all and there wasn't anything left big enough for this quilt, so I had to move on to the next scrap.  Also since this quilt is one block, I sewed more of Fourth Rail as a leader/ender, which meant I was making two quilts at the same time.

Some of the more astute viewers may wonder whether it is a courthouse square or a log cabin because it has elements of both.  Well, it is both. No, I take that back. It is neither. It is a mansion.

And because little matchsticks are able to make something like a mansion, they are pretty mighty. So this is a Mighty Matchstick Mansion.

It finishes at 16" x 17 1/2" and since it is bigger than a breadbox and was made in the correct time frame, I am submitting it to the Bigger Than a Breadbox Project Quilting Challenge.


Once I figured out I was early for the challenge because the deadline is noon on Sunday, not Saturday, I quilted it some more and cleaned off some of the stray threads.

I really enjoyed making this quilt, and it is very tempting to change my original plan for Fourth Rail and make it improv rather than traditional, but I am going to keep going as I have been. That has always been my biggest issue with making a long term scrap project. There are so many great ideas, it is hard to stay committed to one until it is finished.

Wednesday, January 21, 2015

2015 Calendar

Last year, I received a coupon to get a free calendar from Shutterfly.  I gathered a bunch of photos of my quilts and threw them together into a calendar and got it printed.


This year, I received another coupon to get a free calendar from Shutterfly.  I still haven't gotten things planned enough to make a decent planned calendar, but I thought that last year's strategy worked well, so I copied it.  I grabbed some images of quilts I have made - both finished and unfinished.

I didn't want to use the same template I used last year, because I didn't want it to look the same.  Last year's template had quotes on it, and I really liked that idea. Since the template I chose this year didn't have any quotes, I needed to find my own quotes to add to the calendar.  I chose story quote as the word to search. I was planning on finding different topics for inspirational quotes, but I liked so many that I kept with the same theme for the whole year.


Some of these story quotes are about living life, and some of them are about telling a story. I felt that both kinds are applicable to me.


I didn't include names of quilts this time. I probably should have recorded them, but I don't remember the names of all of them, and since many are unfinished, I wanted the flexibility to come up with new names.


I initially thought I had more images of finished quilts than unfinished quilts this year, but it is pretty much half and half.


I added the pictures to the month that it seemed to fit best in.  When I went to the actual page, I was pleased to see that the background color of the template worked well with all of the selected quilt images.


I especially like this purple one with this quilt, although I'm not sure why, since there is very little purple in the quilt.


If you haven't done this before, I highly recommend it.  Seeing the images of these quilts professionally printed makes me feel like a real quilter!


Most of these quilts have not been shown in last year's calendar. In fact, I think there is only one repeat. It is purely accidental; if I had remembered it was on last year's, I would have used a different image.


I had to take the pictures at an angle this year, so you can't see the calendar at its best.  Trust me that it is a high quality calendar and it makes my quilts look very good.


Sunday, January 4, 2015

2014 End of the Year Show and Tell

I finished two quilts this year. At first, I was ashamed at that lowly number, but now I am proud of it. I quilt for fun, not for a job, so I don't need to be productive. I simply need to make the quilts that provide enjoyment for me. And I certainly did that.

Besides my finished quilts, I also worked on other quilt projects that haven't made it to the finish line yet.


 The quilt on the left, Tuxedo Diamonds, was made in early January.  It was fun to make.  I showed it to you last year, but the colors were not right.  They are more true in this one.

 I was impressed by all the red and white quilt shows, and thought I should make a red and white quilt or two to have my own.  It looks good with the red and white optical illusion quilt I made last year.  I got the idea for this quilt from a quilt I saw on Pinterest.  I don't like this one as much as that one, mostly because it doesn't look like I envisioned.

I worked on this Awards Banquet quilt in April. It goes with the red and white theme, but I wanted to add black.  I have a lot of black and white fabric from a fat quarter swap and I wanted to get started using it.  Like Tuxedo Diamonds, I did not use a quilt pattern, but simply used my own ideas.

I was really having fun making and designing this quilt when I found out I needed to spend a month in Lansing for work with very little notice and after the overtime had already started.

I took all my sewing stuff out of the living room and put it in (what was then) the newly organized craft room so my daughter wouldn't have to look at a mess all month. When I came back, I left the mess in the craft room and worked on other quilts and haven't taken it out yet. I think it just needs to be quilted.


My big quilt reveal, of course, is the Improv Quilt, which I already showed you recently.  Once I got over trying to please the Sherri Lynn Wood, I had a lot of fun with the designing aspect of the quilt. I liked being able to make my own decisions about what to do next. I know I can't remember the exact dates on this one, but it was finished before I went to Lansing.  I know I was working on Awards Banquet at the same time as the Improv Quilt. This quilt needs another name, so if you can think of one, let me know. 


I took my sewing machine to Lansing with me, and didn't have a lot of time to decide what project to take with me.  I grabbed a kit that was taunting me when I was cleaning out the craft room.  This kit was waiting while I was trying to implement the "finish the WIPs first" rule, but I decided that the kit had waited long enough, and since it was a kit, it was a WIP.  I was able to work on it after work at the hotel. In Lansing, I worked long hours, but since I didn't have the chores I have at home, I was able to find time to work on it. This one required careful cutting and piecing, which was quite a change from the liberated cutting and piecing of the improv quilt.  The top as directed by the kit is done, as you can see on the table, but I have been adding another border. I put it away when we were hosting a birthday party, and didn't take it out after the party.  I see a recurring theme here.  I think I shouldn't put away any quilts until they are done!


Last, but not least, is this Christmas trees quilt. I have been seeing a lot of trees quilts on Pinterest, and wanted one of my own.  I found a directions for a liberated tree quilt on Diary of a Quilter, and got to work. It is a liberated quilt. I have a lot of Christmas fabric I've gotten on sale over the years, and thought this was a perfect opportunity to use them. I made a whole bunch of trees, and rejected a few that didn't fit the finish size I chose. I'm sure I will be able to use those elsewhere - maybe the back. I started this quilt a couple of days before Christmas, and could have tried to rush this one so I would have another finish for 2014, but I decided to take my time and enjoy the process.  I now have a really nice head start for 2015.


In 2015, I hope to clean up the new mess I made in the craft room and finish organizing it.  Then I want to finish some of the quilts that got abandoned during cleaning missions.  I really enjoyed working on the quilts and they don't deserve to be abandoned. I don't think I will have time to do a lot of quilting in 2015 either, but if I work on finishing what I have already started, I should have some finishes to show for it.

Saturday, December 27, 2014

Questions about Improv Quilt


I thought I'd take the time to answer some questions about the quilt you hadn't thought to ask.

Sherri asked a question on her blog about our quilt making process.  She asked

What blocks and supports your improvisational flow?

This is the first improv quilt I have ever made.  The biggest challenge I had in making this quilt is the lack of guidance.  I am used to hand holding with quilt patterns, and then sometimes I will veer off into my own direction.  This means that I can pretty much know what the finished product will look like.  With fewer directions, I was left on my own to make my own decisions from the very beginning.  While this is freeing, it is also very scary, especially since I was making the quilt for a book.  I wanted to please the author and make a quilt she would be proud to have in her book. It felt like she had specific ideas about what she wanted but she wasn't going to tell us!

Eventually I decided to let go of the idea that it was a quilt for Sherri.  I was going to make a quilt for me, since it would stay in my house.  Once I stopped trying to please someone else, the flow worked much easier for me.

The other thing that blocks me - the reason that this is my first improv quilt - is that improv quilts aren't conventionally beautiful.  This means that when I hang it up in my living room, my guests ignore it or glance at it without making a comment. I 'm sure they were wondering, "What was she thinking?!"  I enjoyed the process of making it, and I love the quirkiness of it, but I don't particularly like the aesthetics of it.  Sherri Lynn has featured some antique quilts on her blog and has tape recorded some conversations as she studies the quilt.  I like the idea of really studying a quilt instead of just looking at it and saying "pretty".  I think improv quilts tend to lend themselves more to this kind of in-depth study than traditional quilts do.

Both of the quilts shown on this post were made without a pattern. One has straight lines made with a ruler. The other one is cut free form.  They both let me be free and play.  I used lots of colors on the rail fence quilt. Lots of leftover fabric. But I also added some color as I went along, as some days I wanted to add a different flavor based on my mood. The one on the right has a more limited palette, but the play was in the design choice.  They both held my attention long enough to get to the finish stage, which says a lot to me.  They are both complex quilts - the rail fence with the variety of scrap fabrics used and the interplay of the different fabrics, and improv quilt with the interplay of the lines coming in at different angles.

I have a feeling that the quilt that will go down the generations to represent me will be something that many people found ugly and tucked in the back of a closet or the attic.  Centuries from now, people will wonder about the person who made this ugly quilt.  Would I want one of these quilts to be my legacy? I don't think so, because they don't completely represent me. But then, neither do the ones that are more conventionally pretty.

Neither one is traditionally beautiful.  This means that most people will glance at them and walk away.  Not worth their time.  Both of the quilts require more study and analysis before the beauty becomes apparent.  I think the people who walk away at first glance are missing out.


Friday, December 26, 2014

Improv Quilt Reveal


Sherri Lynn Wood's book The Improv Handbook for Modern Quilters: A Guide to Creating, Quilting, and Living Courageously is available for pre-order on Amazon.  It officially comes out March 17, 2015.  What this means is that I can now reveal the improv quilt I made earlier this year. Forgive the photo heavy post. I've had a lot of time to take pictures of this quilt!

As I said earlier, I was one of the testers of one of the patterns in this book.  My quilt didn't make it in the book unfortunately, but I appreciated the opportunity to participate. This quilt was all about rhythm.  The score of this quilt is rhythm. I kept my palette very simple with just black and white. I wanted an accent color. I was debating between red and green, but my daughter recommended purple, and so I went with that. I think it was the best choice.


We were to make striped fabric by cutting the fabric into strips free form and then make a quilt out of it.  I deliberately kept my strips from being too straight, not that I would have been able to cut straight lines without a ruler.

I cut the strips in half so I could get variety in mixing and matching.  Then, I sewed them together into stripes of five fabrics.  I made some deliberately dark, some deliberately light, and some medium. I think I had five or six rows.
 I cut them into squares.
 Then I cut them in half to make half square triangles.
I mixed and matched the HSTs so that the would meet at an angle and look like L's.  I sewed them together and stacked them up.


I tried to keep it improv, so I didn't do too much arranging, but I did put them on the design floor to see how it looked. Also since I used the floor in a room that did not have the sewing machine, I was able to keep it improv and free form. I sewed blocks together to make rows.  Sometimes I would have to add more fabric to get the blocks to fit together since they turned out to be different sizes.


After I had all the rows together, I had to try to make the rows fit.  This meant I added more fabric where there were empty spaces.  I wanted a bigger quilt, so I tried to add more than trim away to get them to become the right size.

Zeus helped make sure the quilt didn't escape while I was working on it.


After all the rows were joined, I had to add nips and tucks where the quilt was lumpy.  I did this several times, putting the quilt on the floor to make sure it was as flat as it could be.


Squaring up the quilt was the hardest part, since there wasn't a single line that was straight that I could use. But I folded the quilt and cut to the smallest space, but sometimes I added more fabric to help make the difference.  I quilted it with straight lines using a squiggly stitch my machine provided.


©
Shasta Matova


As you can see, most of the quilt is composed of half square triangles that were joined at an angle to form a box shape.  There is one nine patch, and two blocks that were joined straight together instead of being made into a box shape.  I did this deliberately for an added improv touch.

I like almost everything about this quilt. It isn't conventionally pretty, but I like it.  The dark spot on the bottom right (second to bottom row) where the nine patch and the maverick block run together bothers me sometimes, but they do add to the improv look of it.


1 Improv Quilt
©
Shasta Matova

My sister and I took a couple of my quilts to photograph on some construction equipment.  Now I can finally show these to you. Which one is your favorite quilt walk photo?


2 Improv Quilt
©
Shasta Matova

3 Improv Quilt
©
Shasta Matova
4 Improv Quilt
©
Shasta Matova

5 Improv Quilt
©
Shasta Matova

6 Improv Quilt
©
Shasta Matova

7 Improv Quilt
©
Shasta Matova

8 Improv Quilt
©
Shasta Matova

9 Improv Quilt
©
Shasta Matova

10 Improv Quilt
©
Shasta Matova

11 Improv Quilt
©
Shasta Matova

12 Improv Quilt
©
Shasta Matova

I hope you enjoyed seeing this quilt reveal. I have waited anxiously to show it to you.