
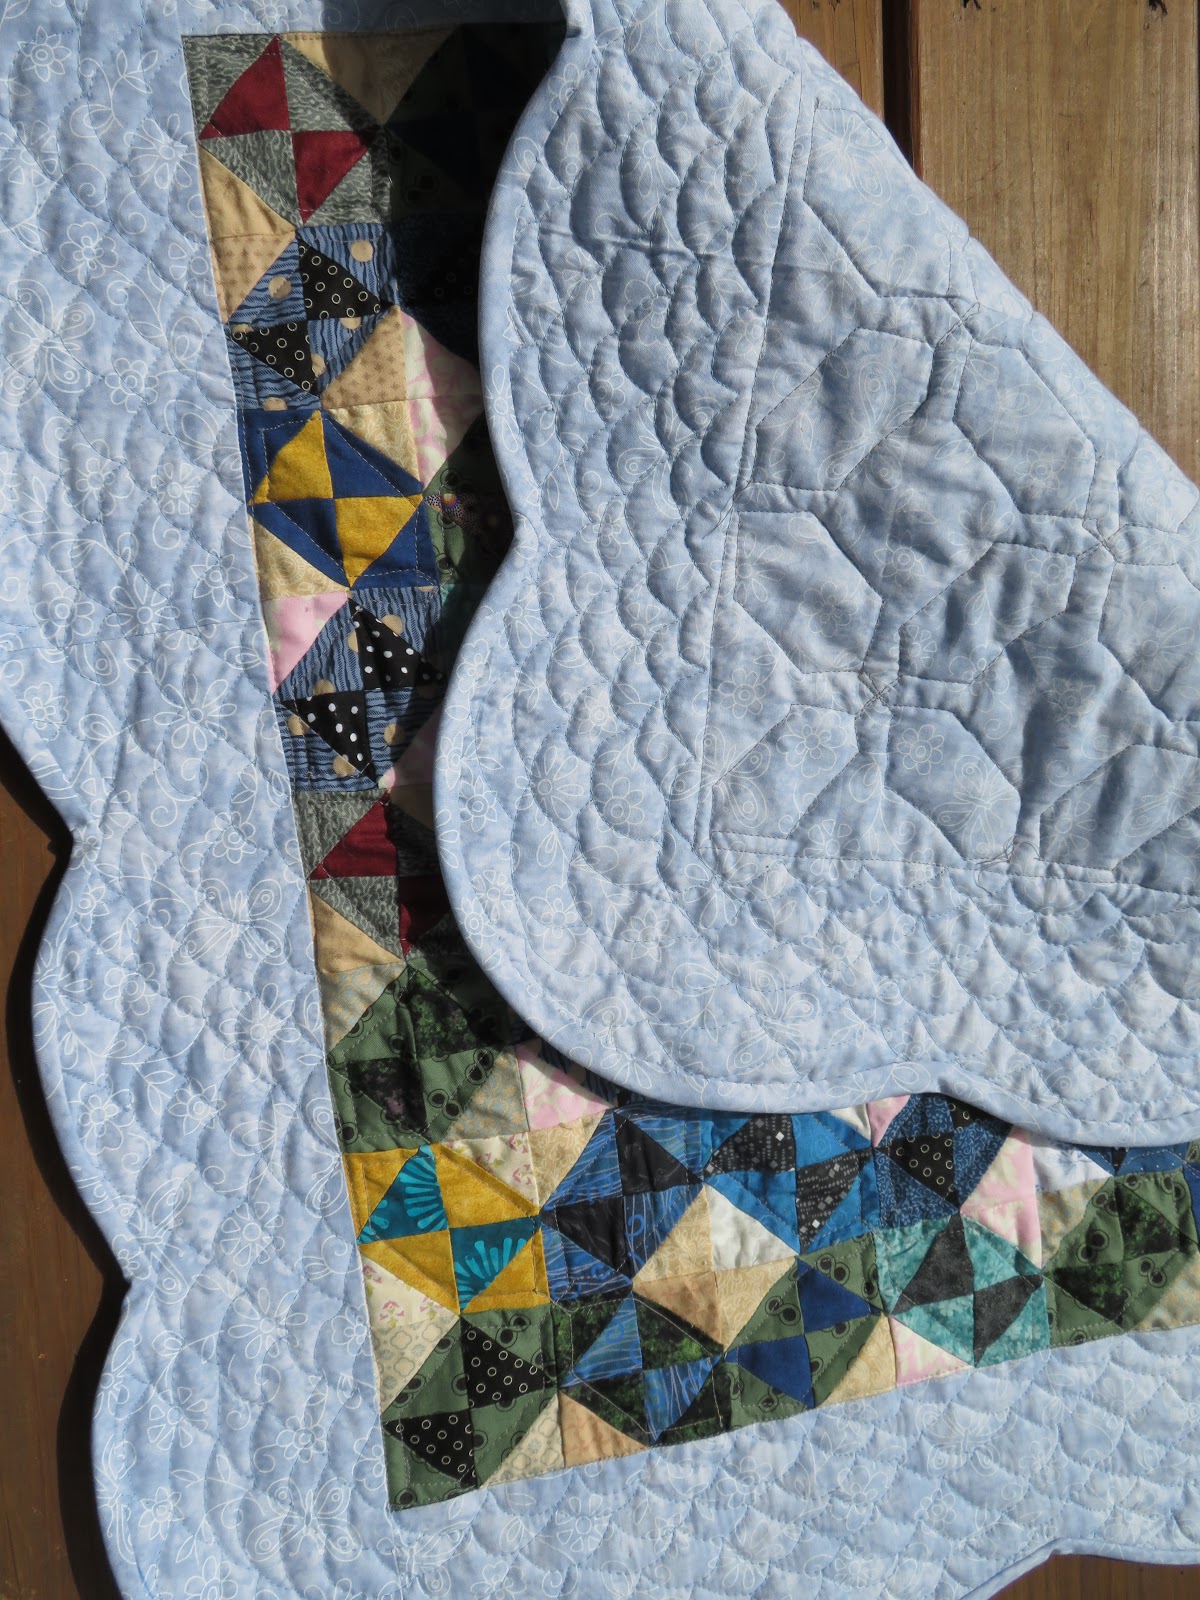
In my last post, I showed you my completed quilt with a scalloped border. Kate asked me for my advice on making a scalloped border. I'm glad she asked because I was thinking about writing a post to remind myself how to do it in case I want to do it again, so I am happy to oblige. Most of this will be in the form of YouTube videos. I watched several videos to get ideas, and am providing my favorites.
I watched this video from Missouri Star Quilt Company. It uses a tool to draw the borders. I used a plate.
What I learned from this video is that the steps of making a scalloped border:
1. Make a quilt top, include a plain border. I recommend adding a slightly bigger border than you think you need. It is going to look smaller once everything is done, plus it looks smaller with holes cut out f it. I also figured if it turns out horribly, I could trim it and make a smaller straight border.
2. Quilt as desired. A general overall design probably works best for a border so you don't have to take the scallop in consideration. Quilt the whole border, even the part you will be trimming off so you can get all the way to the edge. I missed this step, but next time, I will trim the quilt square (or rectangular).
3. Measure the scallops. Divide the quilt in half to find the center. And then divide into whatever number sections you want. I used a freezer paper template to try it out first. I folded the freezer paper to find the sections, and found a plate about the size of those sections, which was a dinner plate. I drew the scallops on the paper and tried it out on the quilt to imagine what it might look like. Cut on the marked line on your freezer paper and press the paper to your quilt to secure it.
4. Mark your cutting line on the quilt. I used a washable marker, which worked out well. I took the scallops all the way to the edge of the quilt, but the video shows space between the top of the scallop and the edge of the quilt. I guess it depends on how big you want your border to be. I did manage to get stray lines where I made mistakes, so I recommend using a washable marker even though, technically if you do it right, you can use something that isn't washable since you can trim it off. Remove, reposition, and press the freezer paper and mark the entire quilt. You can extend or shorten the lines to make the scallops fit and look pleasing.
5. Once you have the quilt marked and are happy with where the scallops will be, breathe deep and cut your quilt on the cutting line.
6. This isn't in the video, and I am not sure it is necessary, but I folded my quilt different ways (joining left and right sides together, joining top and bottom sides together, and diagonally, one at a time) to compare the scallops to make sure they were balanced, and trimmed the ones that weren't. My end result isn't exactly the same on all sides, but it is pretty close.
Then I watched this video on how to make continuous bias binding. This tutorial lets you use a rectangle to make the binding and avoids having extra triangles left over. It also is continuous so you don't have to cut the strips separately and sew them together. The piece looks weird as you are sewing them together, but it might be easier to make this binding this way instead of sewing the strips to each other one at a time. I think I may make binding like this in my future quilts even if they aren't scalloped.
I sewed the binding on the quilt like the Missouri Star Company video showed.
Lastly, I wanted to share this video with you from Sugaridoo. I wasn't looking for a video on how to sew down a binding because I have done it lots of times. I have really enjoyed watching Irene's videos about her cute projects and her life in the Netherlands, and was surprised by how much I learned from this video. She uses a different way to sew down the binding, a stitch in the quilt, a stitch in the binding, which I think is probably more secure than the blind hem stitch I use - stitch in the quilt, catch a few threads in the binding, stitch in the quilt.
I didn't make a notch in the quilt because it didn't seem necessary. I don't know what the corners are supposed to look like but they look okay to me without the notch. I was expecting to have a fold at the scallops but there isn't one.
After I had already finished my quilt, I found this tutorial which shows you how to make a scalloped border without a separate binding. This may be easier, but since I didn't have any trouble with a binding, I guess it depends on your preference. This video shows a different way to measure the scallops so it is worth watching and learning as well, even if you do want to use a binding.
Making a scalloped border on a quilt wasn't as difficult as I thought it would be. It really doesn't take a lot of extra time, apart of measuring and marking the cutting line, and makes a big impact. It is a great way to make a quilt more special. To modernize it, you could use a quilt top that is made in a more modern style, or put the scallops on just one or two sides to make it asymmetrical, or have a really large border to have more negative space for quilting. You can also cut the shape other than a scallop.
Linked to:
Works in Progress - I just finished this quilt, but there are lots of quilts in progress!
Friday Foto Fun
7 comments:
What a helpful post - to you and your readers. I have an old book with directions for scalloped borders but using YouTube videos would be even better. Thanks for putting this together.
Great instructions. I learned a lot. Scalloped borders really make the quilt special.
Your quilt looks fabulous. It's amazing how much interest the scallop border adds. Thanks for putting together all of these references. You might be seeing a bunch of quilts with a scalloped edge.
Thanks for sharing all the tips, hints and videos. I don't have a current project where a scalloped border would work, but you never know.
Thanks so much for all the helpful tips and videos! I’ve only done scallops once, on my Dear Jane quilt and I think I had a ruler or template especially for that. Your quilt is beautiful!
Thank you for taking the time to pull all this together, and for adding your observations/lessons about each stage. I love how your border looks but would never have thought to tackle one. I'm also very interested to see a different way of stitching binding.
What a gorgeous quilt and such a helpful post, thank you!
Post a Comment