Sunday, March 17, 2024

Upcoming Blog Hop and Upcoming Videos


The "Give it a Whirl" blog hop, hosted by Carol Swift starts on Monday. There is a big group of participants and we have been spinning around getting our projects done to share with all of you.

Check it out, I'm sure your head will be spinning from all the fun! The pinwheels are sprinkling happiness throughout blogland.

I will see you on Thursday the 21st!

MARCH 18


Just Let Me Quilt (our wonderful hostess)

Quilted Snail

Pattern Princess

Days Filled With Joy

Quilted Delights

A Quiltery

Bumbleberry Stitches

MARCH 19


Selina Quilts

Inflorescence

Words & Stitches

Quilting Between The Rails

Sew Many Yarns

Vroomans Quilts


MARCH 20


Quilting Gail

Just Sew Quilter

Karrin’s Crazy World

Scrapdash

Time 4 Stitchn


MARCH 21

MooseStashQuilting

Ms P Designs USA

Songbird Designs

Beaquilter

High Road Quilter (that's me!)

Kathy's Kwilts and More

Homespun Hannah's Blog


15 Minutes to Stitch 2024


I have been quilting every day this year. This week I have been alternating between the pinwheel quilt and the pajamas lap quilt. 

15 minute days this week --7 out of 7 days
15 minute days this year -- 77 out of 77 days
Success rate  = 100%


YouTube


On YouTube this week, I recorded videos for both quilts. For the pajamas quilt, I made a tutorial for how to make a quilt with blocks that are on point, but my microphone has malfunctioned, and I didn't check it since it generally works, so I have many videos without sound. I thought I had forgotten to turn on the microphone so I recorded it again. But apparently it is the microphone's fault. Replacing the battery didn't help.

I was getting so frustrated and running out of time so I switched tracks and recorded a video about quilts that are already finished. I am hoping to have some videos ready to go for these types of situations, but so far I haven't been able to get that far ahead.

In today's video, I showed my two Drunkard's Path quilts. I had lots of photos and videos already ready for these quilts so that worked out much better. 


Sunday, March 10, 2024

Quilt Reveal: Pajamas Doll Quilt


It's time for another Project Quilting reveal! The challenge of this week is Wearables.

Your project must be wearable, or have been made from previously worn items, or have another connection to clothes, shoes and fashion accessories.

I gave myself two choices: 

  1. Make a blouse that I have been planning to make for a very long time. I already have the pattern and the fabric chosen.
  2. Make a quilt out of all the pajamas I have been saving to make a quilt.
Since I hadn't made a blouse since high school, I didn't think I could handle the pressure of making it in a week, even though the pattern says it is easy to make. I am keeping it downstairs and hope to make it this year.

Making the pajamas quilt will help me reduce clutter in the sewing room since these flannel pajamas take up a more room than flat fabric would. 

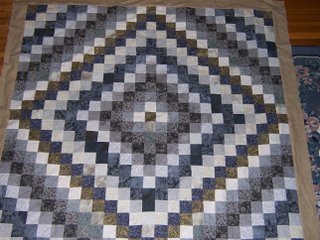
I had seen a quilt in a show I watched recently that was a scrap quilt made entirely out of squares but it was set on point, which added a nice interest to the squares. I decided to do that.

So I cut up the pieces and laid out the blocks on the design wall. I am trying to use up all the fabric as I can and make a nice big lap quilt. Even though these girly fabrics would make a good gift for a girl, I don't feel comfortable giving a gift with my used clothes so I will have to use it or maybe I can give it to my dog Zoey.

I recorded videos as I was making this quilt to give instructions on how to make a quilt on point. I need to learn to be better about taking photographs as well as videos.

Cutting pieces out of clothing, even simple squares, takes longer than cutting them from a flat fold of fabric. Some of it is stretchy, and some of it is faded and I had to decide which part of the fabric to use. I soon realized that there was no way I was going to be able to make a big lap quilt, quilted and bound, by the Project Quilting challenge deadline, so I decided to make a small one out of the fabric I saved in case I needed to piece a block.


The smaller quilt also makes it easier to show in a video as I move pieces around for a tutorial. The squares finish at 1".

I pieced the smaller quilt, and then somebody stole an hour from me. Daylight Savings Time.

This meant I had only 15 minutes to finish it, so I quickly trimmed it and the backing, and sewed around the edges. I turned it right side out and didn't really take the time to carefully poke out the corners. I secured the edges and called it done.


The teal fabric in the photo above in the top left corner is the start of the Pinwheel quilt I will show you on March 21.

15 Minutes to Stitch 2024


I have been quilting every day this year.

15 minute days this week --7 out of 7 days
15 minute days this year -- 70 out of 70 days
Success rate  = 100%

Thursday, March 7, 2024

Quilt Reveal: Web of Life


It's time for the annual Dust Off An Old Quilt Book Blog Hop! I have been participating the last few years and have always enjoyed it.


I have been participating the last few years and have always enjoyed it.


For this hop, I dusted off my Red & White  Quilts Infinite Variety book.  The book features all the red and white quilts that had been in an exhibit at a museum. I had seen the quilt on the cover before the exhibit and the book and had already been fascinated by it. 

My friends and I had done some calculations on how to make this quilt. I had done some research and had even found some instructions about how to make the quilt. I bought a 9 degree ruler. The quilt can be strip cut, but you have to cut the triangles in one direction. The smaller triangles are in the center and the larger triangles are on the outside.  This means you waste half of the triangles. I wondered what the other half would look like if sewn together.

My first worry was whether I am capable of making a checkerboard like that neatly, the regular "squares" much less the tiny points in the center. I decided to make a sample block. In this one, I decided to make it so that I can use all the triangles. I made a strip set with a light on one side and a dark on the other side. I then cut triangles, moving the ruler up or down depending on what color I wanted to be the smallest.


This won't help me reduce waste on the optical illusion quilt, but it does give me a good idea about how difficult this quilt might be if I make it on a bigger scale.

This block may look familiar to you. I started it a long time ago, in 2010. I then added a backing to hide the raw edges. I added it to a gray background, but I didn't like the way it looked, so I abandoned it. I hadn't put it on my list of quilts because I was just playing and hadn't started the Optical Illusion quilt.


During the 15 Minutes to Quilt Challenge in December, I took off the gray background and made a quilt sandwich with a white background. I then had to leave the quilt alone and move on to my next UFO for the next day's video. 

But since it was so close to completion, I didn't put it away, and worked on it in the spare bits of time I could find.


I decided that instead of centering the spiderweb to the rectangular quilt, I wanted to have the spiderweb be a little bit higher and add something else to the bottom.


I traced out a design from another book of quilting patterns. I appliqued the spiderweb and the designs to the quilt sandwich, and decided to add a word. 

What word? Web of Intrigue? Web of Lies? Web of Deception? I looked it up, and the first word I found was Web of Life. Sounded good to me. It was late at night by that time and Life is a nice short word and therefore easy to applique, so I decided to choose that. I found a font I liked and traced out the letters.

Man did not weave the web of life; we are merely a strand in it. Whatever we do to the web, we also do to ourselves. Adapted from Chief Seattle


Then I fused the letters on and quilted them down.


I hope you enjoyed seeing this quilt finished. You've waited a long time for it! The video for this quilt should be out on Sunday on my YouTube channel, Quilt and Color.

Here are the people who are participating in the blog hop this time. 

Karrin's Crazy World

Quilting Patchwork Appliqué

High Road Quilter (that's me!)
Beaquilter (our wonderful hostess!)

Sunday, February 25, 2024

Quilt Reveal: Red and White Hourglass Quilt

I have finished the Red and White Hourglass quilt for the Project Quilting challenge for this week . The challenge is to make a quilt that is inspired by an hourglass. It must be started and finished in one week.

I've actually wanted to make a red and white hourglass quilt for a long time, years. I saw one in a museum and the docent would not allow me to take a photo of it, even though it is a simple traditional pattern. I drew it out and shaded in the red parts so I would remember what it looked like, but I must have been on a No New Quilts Until the Old Ones are Finished rule, so I did not start the quilt and it stayed on the To-Do List.

I thought about making a red and white hourglass quilt for this challenge, but I wasn't sure I would be able to make a good one in time. I wanted one with enough blocks that the secondary patterns would show through and I also had the blog hop quilt to finish.

So I thought I would make one with one long hourglass block, and a quote on the other side. I got the bright idea that I could print the quote on fabric and that would make the words easy to get on the fabric.


Then I got the bright idea that I could applique an hourglass. So I looked for a pretty picture, and while I was playing in Canva, I thought I could make the whole design, print it on fabric, and make a wholecloth quilt with minimal quilting, easy peasy.

The printer didn't cooperate. I don't think it is the printer's fault. I think that with new releases of Windows and printer drivers, the printer is becoming obsolete even though it works perfectly fine. Or maybe I don't use the ink fast enough and it dries up before I get a chance to use it. This problem has been happening, so I don't think it is just this ink cartridge. There was some faint picture but not enough to see what it is.


So I went to Plan B, or is it Plan A? I used some solid fabric and decided I wanted a bigger quilt so I added other reds from my scrap pile. I didn't make the block with half square triangles that turn into quarter square triangles. I made stripes and set the squares on point.


I found some more red scraps when I went to look for a backing fabric so I made more blocks.


Since this is a quilt that I wanted to make for a long time, I wanted to make it right, so I quilted on both sides of the ditch so that the hourglass blocks are more apparent. The lines are organic sewn. I am hoping that the flaws in the points get hidden rather than accentuated.

I have always admired lightly quilted quilts and I really like the look of this one.


I trimmed the quilt. My original plan was to birth the quilt, but I decided to use the leftover red fabric I had. I didn't have the time to make the quilt bigger, but I thought it would show the quilt better if the backing fabric could not be seen from the front.


I machine stitched the binding to save time. This is a skill I am learning and have not perfected, but I guess I won't learn it if I don't keep trying.


I'll take some glamor shots later, but I wanted to make sure I got this blog post up. I missed the deadline on one of the challenges because I didn't have the blog post up.


Thank you for this challenge again this year. I finally got my red and white hourglass quilt made!

I will post a Youtube video about this quilt and give you a link here next Sunday.


15 Minutes to Stitch 2024


I I have definitely been quilting every day.

15 minute days this week --7 out of 7 days
15 minute days this year -- 56 out of 56 days
Success rate  = 100%

Thursday, February 22, 2024

My Blog Hop Day: Pink Explosion

Hello!

Welcome to my blog hop day!


Back in October, I posted a video on my YouTube channel where I showed the African Ankara fabric I had just bought. When I folded them into bolts and got them ready to take upstairs, one of the bolts wound up sitting next to another fabric I wanted to take upstairs.

I really liked the combination of the Ankara fabric and the pink fabric and thought that the combination would look good in a quilt.


But I was about to start my daily videos with the 15 Minutes to Quilt challenge where I worked on existing UFOs, so I went ahead and put them away.

I resisted starting any new quilts in December, but the idea of combining that Ankara fabric with the pink fabric still stayed in my mind.


The challenge for the blog hop this month is Love. 
This challenge is to show us what you LOVE. Moose of course are optional!
I was almost planning another quilt for the Moose Be Love blog hop, and was tempted to use a Moose, but I realized that the pink fabric would actually meet the Love theme, so I decided I could combine this blog hop with my idea of using the pink fabric with the black and white Ankara fabric.


Although I had a month to make this quilt since the last blog hop day, the Project Quilting challenges which happened every other week meant that I only had two weeks to make this quilt. I decided that I wanted to make a big quilt instead of a small one. I knew I wouldn't be able to finish a quilt from start to finish, but decided I could at least finish a quilt top by that time.

I'm not sure that I combined the right fabrics, since this Ankara fabric doesn't appear to be in the stack of fabrics in the pile in the top picture, but these work so I am not going to worry about it. I added another pink and a purple fabric to go with the pink and the black and white fabric.

I decided that if I cut properly and sew properly, I will not have to trim the blocks. I cut very carefully. I drew carefully straight lines. Then I zipped them through the sewing machine in what was not straight lines.

Since I had promised myself that I didn't have to trim blocks to make this quilt, I decided the piecing is going to have to be improvised to work.


I placed them randomly on the design wall but it didn't really impress me. This is my first quilt using a design wall and I decided to do some designing, so I placed the triangles in alternating directions. I like how it forms diamonds and pinwheels shapes and keep your eye moving throughout the quilt.


I combined the blocks into four patches, then sewed the columns together. Since this is my quilt using a design wall, I still have a lot to learn about how to use it properly. I understand the concept of webbing blocks in theory, but it will take some practice for me to figure it out in reality. I think the fact that these are improv blocks and not all the same size created more of a challenge in webbing.

It is amazing how much room the seam allowance takes up. 

I thought I would have to add coping strips or do more cutting to get the columns to fit, but they fit all right.


So here it is, my finished quilt top. I sewed one of the columns incorrectly, but I actually like the break in the pattern so I am keeping it that way. It is a nice way for me to combine my original chaotic plan and the more planned design wall strategy.

I am glad I was able to get the top finished for my blog hop day. There is a little bit of waviness which I might have to fix before I quilt it, but I have chosen the backing and hope to get this in the quilting stage soon. I am going to slow down at this stage and be more mindful so that the quilt gets a good finish.  I will post a YouTube video about this quilt on Sunday. I have already posted a couple of videos with leftover fabric from this quilt.

This is Project Quilting Week so I will have to fit that in as well.

Thank you for visiting my blog on this blog hop. Thank you for forgiving me for not completing and for not planning a completed project for my blog hop day. I am trying to be a gentler boss of myself.

The previous post has all of the other people who are participating in the blog hop. I hope you will visit them as well.

Here is the video about this quilt top.